by
by That is a fantastic skill to learn! The technique of adding a crochet border or edging to a finished piece of fabric—whether it’s cloth (like linen, cotton, or towels) or a knitted/crocheted edge (like a blanket)—is a classic way to customize and finish your work.
The key to applying crochet to any fabric is the Foundation Row, which creates stable anchor points without damaging the material.
Here is a detailed tutorial on How to Crochet a Pattern onto Any Kind of Fabric, followed by a simple, versatile pattern you can apply.
🧵 Applying Crochet Edging to Fabric: The Foundation Row
Before you can add any decorative pattern, you must create a stable row of loops along the fabric edge.
Materials You’ll Need
- Fabric: The item you wish to border (e.g., towel, pillowcase, blanket edge).
- Yarn/Thread: Fine cotton thread (Size 10 or 20 for delicate fabric) or yarn (matching the weight of a blanket).
- Crochet Hook: A size appropriate for your thread.
- Prym Punch Tool / Weaving Needle / Small Awl (Optional but Recommended): To pierce holes evenly if the fabric is dense.

Phase 1: Creating the Anchor Holes
This is the most crucial step for fabric that is not already crocheted/knitted.
- Marking (Optional but Recommended): Use a ruler and a disappearing fabric marker to mark evenly spaced dots along the hem. The distance between dots will determine the density of your final stitches.
- Tip: Start 1/4 to 1/2 inch from the edge. Space the holes 1/4 inch apart for fine lace or 1/2 inch for thicker yarn.
- Piercing: Use your small awl or a thick tapestry needle to gently and carefully pierce a small, clean hole at each marked spot. Do not cut the fabric—you are simply separating the weave.
- Starting Point: Start your work in a discreet location, like the bottom corner seam of a towel.

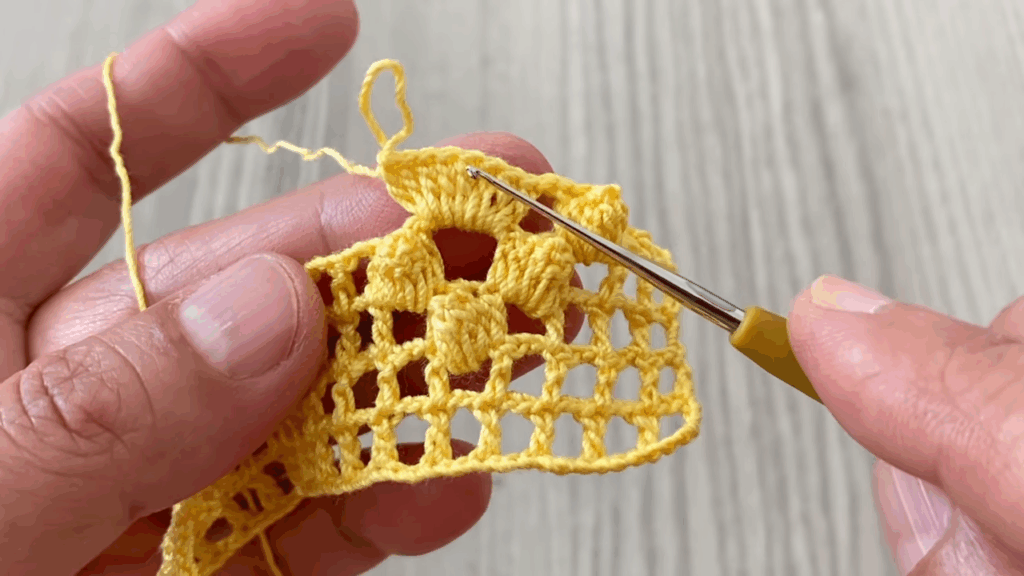
Phase 2: Crocheting the Foundation Row (Anchor)
This row turns your pierced holes into usable crochet loops.
- Join: Insert the hook into the first hole. Yarn over (YO) and pull a loop through the fabric (two loops on the hook). YO and pull through both loops (sc).
- Chaining: ch 1 (to bridge the space to the next hole).
- Repeat: [Insert hook into the next prepared hole, work 1 sc, ch 1] around the entire edge of the fabric.
- Finish: Join with a sl st to the first sc.
Your fabric now has a stable, crochetable edge ready for any pattern.
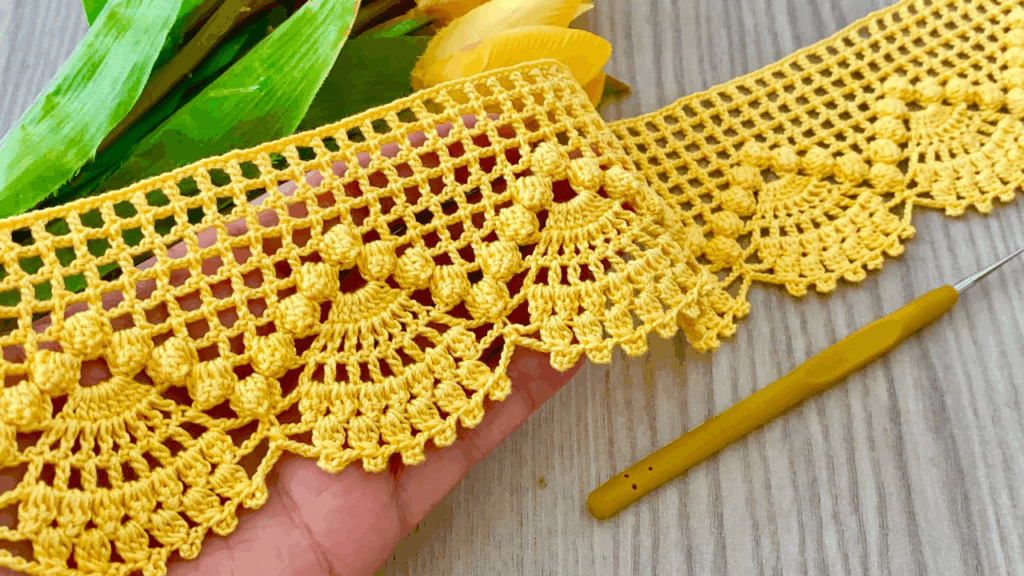
The Versatile “Simple Scallop and Picot” Edging
This pattern is elegant, easy to repeat, and looks beautiful on any medium.
Row 1 (Mesh Foundation – Works off the Anchor Row)
This row ensures the correct spacing for the scallops.
- ch 1. Work sc in the same stitch.
- Chain Space: ch 3. Skip the next ch-1 space and the next sc.
- Repeat:[sc in the next sc, ch 3, skip the next ch-1 space and the next sc] around the edge.
- Goal: The number of ch-3 loops should be a multiple of 3 for this pattern.
- Join with a sl st to the first sc.
Row 2 (Building the Scallops)
We work the decorative shells into the ch-3 loops.
- sl st into the first ch-3 loop.
- First Shell: ch 3 (counts as dc). Work 4 dc into the same ch-3 loop. (Total of 5 dc in the loop).
- Anchor: Work sc into the next sc anchor stitch.
- Repeat: [5 dc Shell into the next ch-3 loop, sc into the next sc anchor] around the edge.
- Join with a sl st to the top of the beginning ch 3.

Row 3 (Picot Finish)
This row adds the final decorative points and stabilizes the scallop edges.
- sl st over the next 2 dc stitches (to move to the peak of the scallop).
- Center Point: Work sc in the next (3rd) dc stitch.
- Picot: ch 3, sl st into the first ch (the loop).
- Anchor: Work sc in the next sc anchor between the shells.
- Repeat: Continue the sequence [sl st over 2 dc, sc in the center of the shell, Picot, sc in the anchor between the shells] around the edge.
- Join with a sl st to the base of the first sl st. Fasten off.
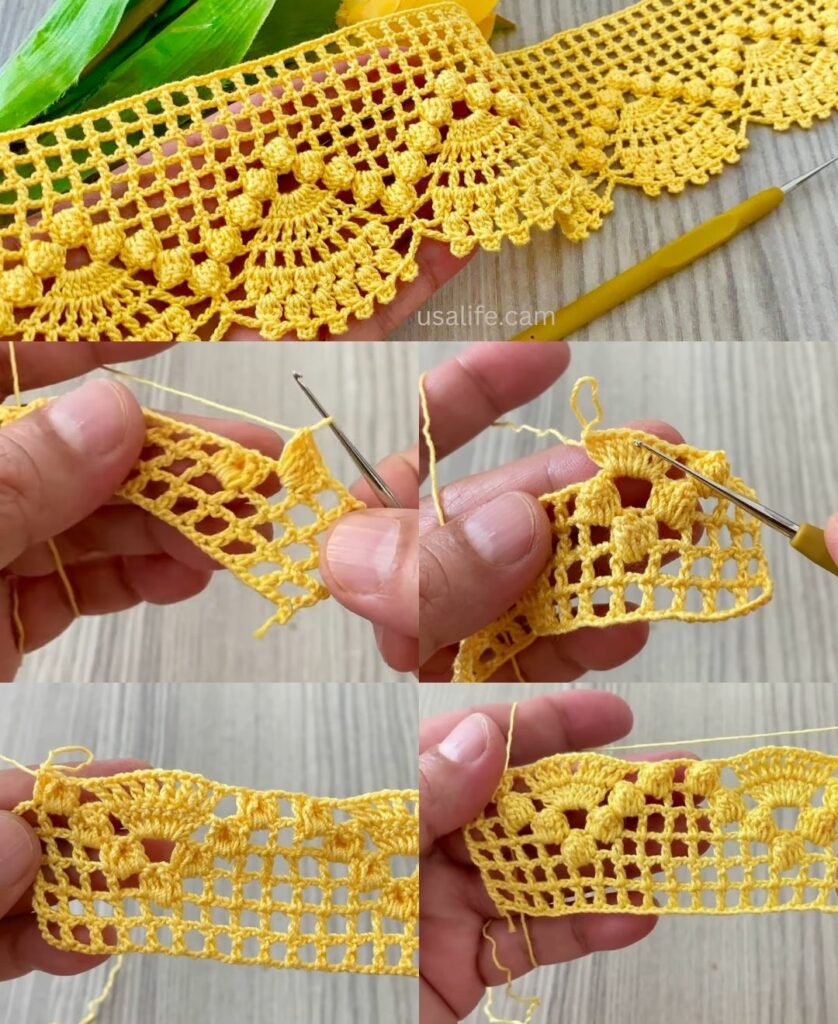
Final Step: Shaping and Setting
- Blocking (Recommended): Lightly steam or mist the crocheted edge. Gently shape the scallops and pull the fabric taut. Allow it to dry completely. This relaxes the tension between the fabric and the thread, ensuring the edge lies flat and beautifully defined.
Video tutorial: