 by
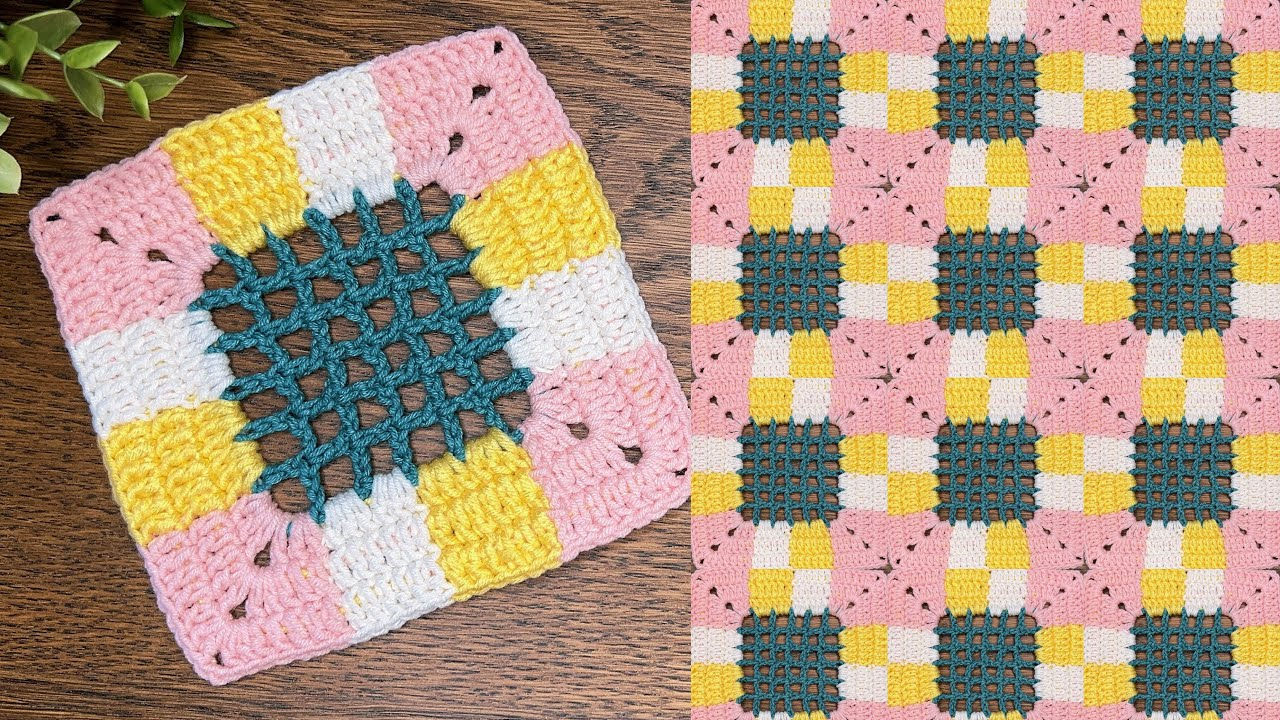
by The “Modern Granny Square” shifts away from the traditional, hole-filled look and leans into a solid, architectural aesthetic. This creates a cleaner, more contemporary fabric that looks high-end, structured, and intentional.
Here is the step-by-step masterclass to crocheting a modern solid square.
🧶 The Modern Toolkit
| Tool | Recommendation | Why? |
| Yarn | Cotton or Bamboo Blend | Provides crisp stitch definition and a smooth, modern finish. |
| Hook | 4.0 mm (G/6) | A slightly smaller hook creates a dense, “woven” fabric. |
| Extras | Stitch Markers | Essential for marking the corners so your square stays perfectly symmetrical. |
Stitch Key (US Terms):
- ch: Chain
- sl st: Slip Stitch
- dc: Double Crochet
- Corner: (2 dc, ch 2, 2 dc) in the same space.
🛠 Step-by-Step: The Solid Modern Square
Round 1: The Core
- Start:
ch 4, join withsl stto the first chain to form a ring. - The Start:
ch 3(counts as first dc). Work 2 dc into the ring.ch 2(corner). - The Pattern: [Work 3 dc into the ring, ch 2] three more times.
- Join:
sl stto the top of the initialch 3.
Round 2: Defining the Shape
- Travel:
sl stto the first corner space. - Corner:
ch 3(counts as dc), 2 dc,ch 2, 3 dc (all in the same corner). - The Side:
ch 1. - The Pattern: In every corner, work
(3 dc, ch 2, 3 dc). Between corners, workch 1. - Join:
sl stto the top of the initialch 3.
Round 3: The Modern “Solid” Fill
- Travel:
sl stto the corner. - Corner:
ch 3, 2 dc,ch 2, 3 dc (all in the corner). - The Solid Edge: Instead of skipping stitches, work 1 dc into every single stitch across the side.
- The Corner: Work
(3 dc, ch 2, 3 dc)in the corner space. - Join:
sl stto the top of the initialch 3.
By filling the side spaces with dc stitches, you eliminate the “gaps,” resulting in a solid, tile-like square that looks much more contemporary.
📐 3 Secrets for a “Boutique” Look
1. The Color Palette
Modern design thrives on intentional palettes. Instead of random scraps, choose a “Tonal” or “Nordic” theme:
- Tonal: Use three shades of one color (e.g., Cream, Sage, Forest Green).
- Neutral: Use only greys, creams, and charcoals.
- Color-Blocking: Use one solid neutral color for all your squares, but use a bright, popping color only for the final round (the “frame”).

2. The Invisible Join
Avoid standard slip-stitching to join your squares. Instead, lay your squares side-by-side and use a Mattress Stitch with a tapestry needle. By sewing through the Back Loops Only (BLO) of the edges, you create a seamless, flat seam that looks like it was machine-sewn.
3. Steam Blocking (The “Game Changer”)
This is what turns a project from “homemade” to “handmade.”
- Pin your squares to a foam board (or a thick towel) using rust-proof pins, pulling them into a perfect, sharp-cornered square.
- Hover a steamer over the top (do not touch the iron to the yarn).
- The heat relaxes the cotton, and as it dries, the squares will “lock” into their perfect shape. This ensures your final blanket or garment is perfectly symmetrical.
💡 Project Inspiration: The Modern Throw
For a stunning modern throw:
- Make 30 solid squares in a neutral cream color.
- Use a dark charcoal yarn to join them.
- This creates a dark, graphic grid that makes your cream squares stand out, turning a simple blanket into a piece of high-end home decor.
Would you like me to help you create a specific “joining map” for a throw blanket using these solid squares?